Get the weather information through an Android app constantly and use the solar energy generating by the PV panel to charge devices.
Advertisement:
Read Later
Get the weather information through an Android app constantly and use the solar energy generating by the PV panel to charge devices.
Components :
Arduino Nano R3 [1]Lipo Rider V1.3 [1]Solar Panel [1]HC-06 Bluetooth Sensor[1]DHT11 Temperature and Humidity Sensor[1]Laser Module[1]Li-Ion Battery[1]Mini Breadboard [2]Jumper Wires [1]I had been working on a circuit being powered by the solar energy to charge my phone battery and I realized I could make it more efficient by turning the circuit into a portable weather station sending data to my phone through an Android app(Station) over Bluetooth, so I used Lipo Rider V1.3 to charge a lithium battery with the solar energy generating by a solar panel and to power Arduino Nano with the lithium battery as a current source.


Components outside of the range may cause a circuit overload to Arduino, according to Lipo Rider V1.3 page on SeeedStudio.com so that make sure the solar panel and the lithium battery you have are in the right specifications for Lipo Rider.


Solder a JST connector to the solar panel and the lithium battery if it was not attached them one.


Connect the solar panel and the lithium battery to JST inputs and turn the control button on, then it is ready to charge either a phone battery or Arduino Nano.


Make the connections by taking the steps at the code and the schematic below.

In addition to the features of the project, I made a laser module controlled by Station (Android app), just for fun.

When the code is uploaded to Arduino Nano, Station (Android app for the project) is ready to collect the data packet being send by HC-06 Bluetooth Module.
Features:
-Get the weather information constantly.
-Control the laser module


This application is created by using the source code of MIT App Inventor 2 and the app is compatible with Android version 2.1 or up.

You can download the app and upgrade it by changing Station .aia file below.
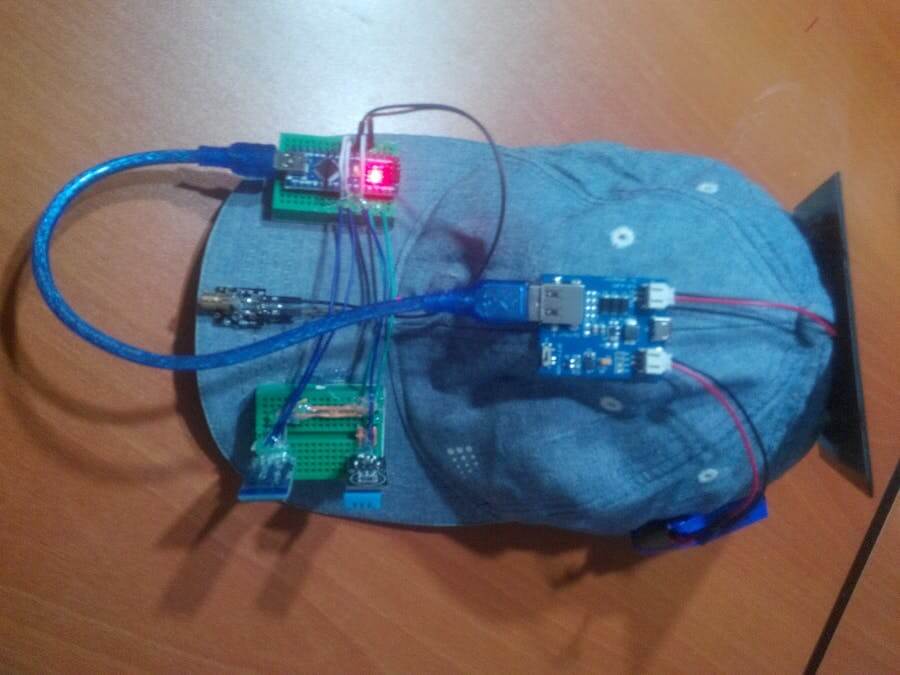
After I finished the project, I put it on the top of my rope hat by using a hot glue gun and therefore sunlight strikes the solar panel at close to a right angle. Now, I use my improved rope hat as a test device for my experiments at the outside.


Schema
Download
Fritzing.fzz
Download

Station.apk
Download
Station.aia
Download
Mobile Weather Station.ino
Download
      /////////////////////////////////////////////
     //   Mobile Weather Station Being Powered  //
    //            by Solar Energy              //
   //               (Android)                 //
  //             by Kutluhan Aktar           //
 //                                         //
/////////////////////////////////////////////


// Get the weather information through an Android app constantly and use the solar energy generating by the PV panel to charge devices.
//
// Features:
//
// -Get the weather information constantly.
//
// -Control the laser module.
//
//
// Connections:
//
// Arduino Uno
//                           DHT11 Temperature and Humidity Sensor
// Pin 2  -------------------
//                           Laser Module
// Pin 3  -------------------
//                           HC-06 Bluetooth Module
// Pin 4  ------------------- TX
// Pin 5  ------------------- RX

#include  // Include Arduino libraries.
#include

int LaserPin = 3; // Define the sensors pins.
int Connect_RX = 4;
int Connect_TX = 5;

int humidity;    // DHT11 variables.
int temperatureC;
int temperatureF;

SoftwareSerial Connect(Connect_RX, Connect_TX); // Connect the bluetooth module.

DHT dht; // Start DHT11.

void setup() {
Serial.begin(9600); // Initial serial connections.
Connect.begin(9600);
dht.setup(2);  // Define DHT11 pin.
pinMode(LaserPin, OUTPUT);

}

void loop() {
  getDataToDHT();
if(Connect.available()){
  char c = Connect.read();
  Laser(c);
 }
  sendDataToConnect();
}

void Laser(char i){ // Commands when Arduino gets a char.
 switch(i){
  case '1':
  digitalWrite(LaserPin, HIGH);
  break;
  case '2':
  digitalWrite(LaserPin, LOW);
  break;
  }
}
void getDataToDHT(){ // Collect data and create the data packet.
 humidity = dht.getHumidity();
 temperatureC = dht.getTemperature();
 temperatureF = dht.toFahrenheit(temperatureC);
 delay(dht.getMinimumSamplingPeriod());

}

void sendDataToConnect(){ // Sending function.
 Connect.print(temperatureC);
 Connect.print("°C");
 Connect.print("\n");
 Connect.print(temperatureF);
 Connect.print("°F");
 Connect.print("\n");
 Connect.print(humidity);
 Connect.print("%");
 delay(1000);

}
1 ) Arduino Nano V3
2 ) Lipo Rider v1.3
3 ) Solar Panel
4 ) HC-06 Bluetooth Module
5 ) DHT11 Temperature and Humidity Sensor
6 ) KY-008 5V 3pin 650nm Transmitter Dot Diode Copper
7 ) Nitecore NL1835 3.6V 3500mah 18650 Protected Li-ion Rechargeable Battery
8 ) Mini Breadboard